Greetings!
koyaanisqatsi is correct in the sense that “you can’t get there from here!”
Assuming you’re flashing a Raspberry Pi image, (like a version of Raspbian), you will end up with two partitions:
- A very small FAT32 partition that is read by the device at initial boot, and is later re-mapped to the /boot part of the root file system. It’s usually not any larger than a couple of hundred megs in size.
- A much larger ext4, (Linux), partition that can grow to occupy the entire rest of the card.
I have not tried flashing a BalinaOS image, but I suspect that it would be something very similar, because the Raspberry Pi’s boot requirements are quite specific, and certain things are expected to be in certain places for the Pi to boot properly.
Jetson Nano images are more complicated. Because they use an interesting variant of the GPT partition structure, (which reminds me more of Apple’s HPFS partition format, or the format used by Solaris/Dec/AT&T Unix), there are at least a half-dozen partitions, each having a particular reason for being there.
(spoiler)
If you can read the one FAT32 partition in Windows, it’s a better than even-money bet that your card is fine and you really don’t need to do anything else, unless you want to re-format the card so that Windows can see the entire capacity of the card again - which makes it unbootable for the Raspbarry Pi.
(/spoiler)
==========================
If you decide you want to “un-flash” the card and use it’s entire capacity for something else, simply re-formatting using the SD formatting tool won’t work - because it is designed to format the first non-Linux partition it finds. To completely re-reformat the device, you have to remove all the pre-existing partitions first, then re-create the device as one single partition that’s the entire size of the device.
To do that, you will need to use either diskpart from the Windows command prompt, or right click on “My PC” (Windows versions before 10), or “This PC” (in Windows 10), and then select “Manage”. You then select “Disk Management” and look for the row that does not contain your “C:” drive.
If your system is a “normal” installation where the primary system hard drive is the standard internal device, your internal drive should be the first row. (My system has both Windows 10 and Linux Mint installed, so there are a lot of extra partitions on that first drive.)
Because this messes with disks and stuff in low-level ways, you’ll need to have Administrator level privileges or an Administrator level password to continue.
For this example, I am going to destroy a freshly-imaged Raspberry Pi SD card and recreate a Windows compatible partition on it. Don’t worry though, once I’m done, all I have to do is crank-up Etcher again and re-flash my Raspberry Pi image! 

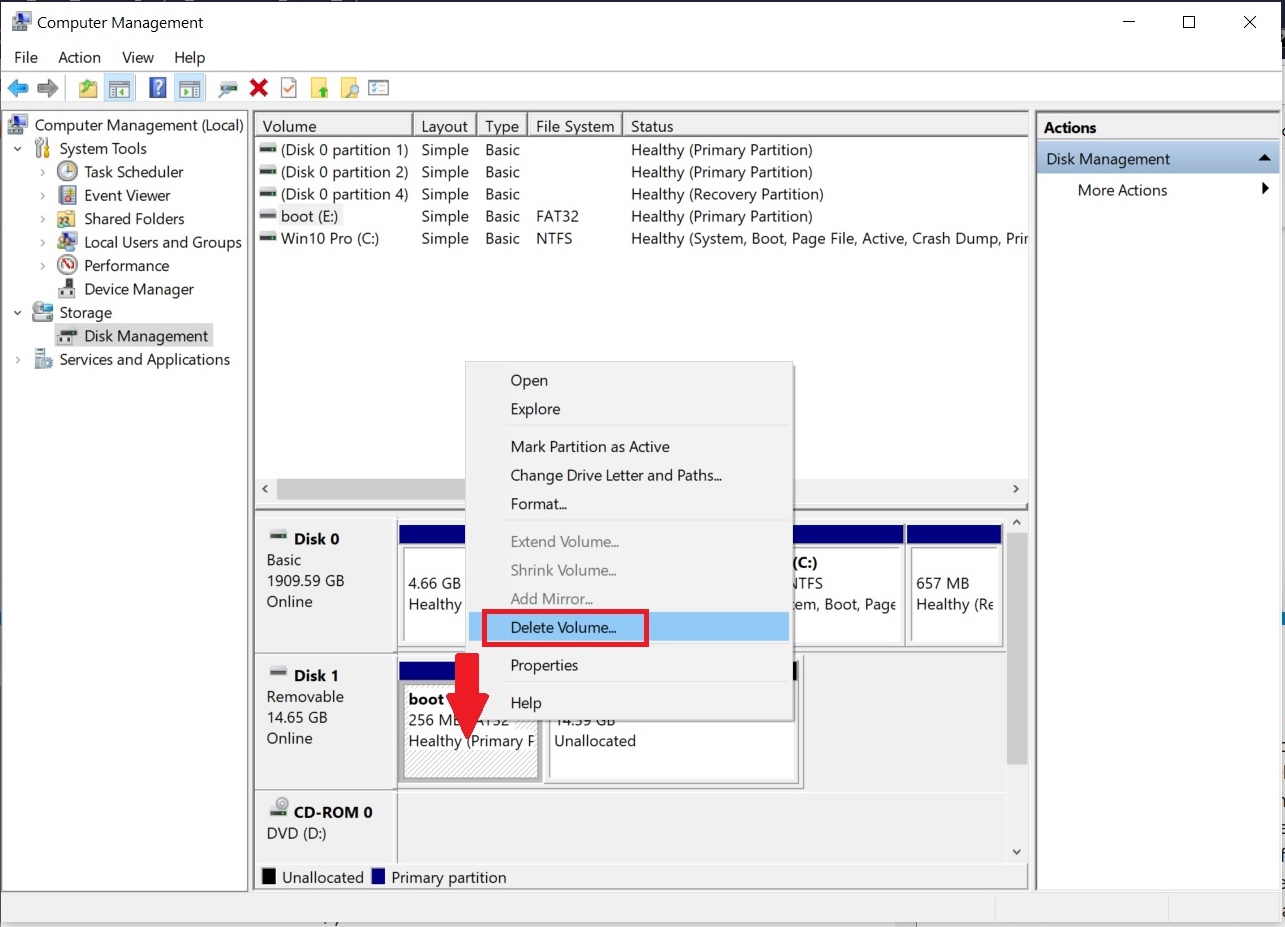
In my case, the SD card is the second row, and you can see three areas: The first (small) FAT32 partition. The second, (larger), Linux partition and - in this case - a bunch of unused space since I reduced the size of the second partition to make the image I’m flashing smaller. The two existing partitions have a dark blue top-bar and the unallocated portion’s top bar is black.

You click on the second, (Linux), partition and then right-click. In the pop-up you see the option “Delete Volume”. This is what deletes the partition.
WARNING!
Partitions, once deleted, are not recoverable!
(At least, not without fancy tools and a lot of luck.)
Once you select “Delete Volume”, there will be a brief pause and then you will see the “Unallocated” part of that drive becomes larger and only one partition is left - the small FAT32 partition.
You do that again with the remaining partition as shown below.
Once that is done, the entire device is now “Unallocated”.

Click into the unallocated space, right click, and select “New Simple Volume” which is Windows-Speak for a “new primary partition”.

At this point, you can select “New Simple volume” and accept the defaults which will - depending on the size of the card - give you a FAT32, exFAT, or NTFS volume.

Here you see a newly created FAT32 partition that is now the entire size of the drive.
As a matter of persional opinion, given the choice between an exFAT partition or a NTFS partition on a larger device, I usually pick the NTFS partition unless I have a good reason not to.