Building a nanny bot

Jupyter notebooks

Did update the jetbot branch.

  • Automatically launch nvargus-daemon
  • Add jetbot-data persistent storage (/data)
  • Provision JetBot notebooks (/data/notebooks)
  • Auto start Jupyter notebook (password jetbot)

You can access notebooks via http://19c80a8.local/, where 19c80a8 is your device UUID (short one).

I’m wandering

Here’s the short video of wandering bot. Launched with:

python3 jetbot/jetbot/apps/wander.py /data/best_model.pth

If your bot isn’t wandering properly (camera is upside down, like mine), do the following:

  • Replace nvvidconv with nvvidconv flip-method=2 in the jetbot/jetbot/camera.py file
  • cd jetbot && python3 setup.py install
  • Launch the wander.py app again

Jetson Nano audio output

My nanny bot should be able to play some sound effects. The problem here is that there’s no audio output on the Jetson Nano developer kit board. To be more precise, there’s HDMI/DP, but I do not want additional attach adapters and make the bot bigger (wider).

I²S, SPI, … what is this

Couple of options. I²S (it’s not I²C, see, S vs C) or SPI. If you don’t know what it is, I recommend to read linked Wikipedia articles. What are the differences?

There is a lot more to audio than bandwidth. The way I²S works, the data are provided just in time to be converted to analog. So the I²S DAC or codec doesn’t need to buffer data or maintain any type of complex synchronization. It relies on the incoming clock to determine the sample rate. This also means that the data must be sent continuously, meaning that the I²S bus will be completely utilized at all times while audio is playing.

If you wanted to use SPI the same way, you would have to run it at exactly the right rate, always delivering data just in time to be converted to analog. This means that the bus would be 100% occupied during audio playback and unavailable for anything else. Otherwise you would need to work out a complex buffering scheme and hardware flow control to tell the host when to send more data, etc.

I guess a simple way of answering the question is that I²S is specifically deisgned to send audio to a DAC. SPI is more general purpose. Most SPI implementations do not support the type of fine-grained clock speed control that would be needed to interface directly to a DAC the way I²S does.

Source: https://electronics.stackexchange.com/a/384342

I²S is clearly the winner here.

SFIO

There’s another problem. By default, all those pins on the Jetson Nano are GPIO. But we need SFIO (Special Function I/O), which is a dedicated function within the SoC. This must be set before or during the boot.

To achieve this, we have to:

  • decompile DTB,
  • patch DTS,
  • compile DTB,
  • flash DTB.

gpio-to-i2s

I’m going to stop now. It’s more complicated and it has no sense to cover all those details. So, if you’d like to use I²S DAC (digital to analog converter) + amplifier + speaker, check the gpio-to-i2s folder (be aware, jetbot branch).

It contains all the steps you have to proceed with and there’s also patch-and-flash.sh script, which automatically patches the DTB and flashes Jetson Nano for you.

But before you proceed, please, read the whole README. You have to put Jetson Nano into recovery mode, etc.

HW

I’d like to keep nanny bot as small as possible and I’m throwing away previously purchased amplifier. Did order Adafruit I²S 3W Class D Amplifier Breakout - MAX98357A for £6.23.

From the description:

Perfect for adding compact amplified sound, it takes 2 breakouts (I²S DAC + Amp) and combines them into one

In other words, I have a very small board, which combines I²S DAC + amplifier.

Photo source: https://www.adafruit.com/product/3006

Just ordered it, so, all these things I mentioned here are untested. I mean, I flashed the Jetson Nano with patched DTB, it boots, /sys/kernel/debug/tegra_gpio looks good, … but … Will test it next week when the DAC + amp will arrive.

Adafruit MAX98357 I2S Class-D Mono Amplifier

The MAX98357 amplifier just arrived. Made a quick test and it surprised me how well it works.

Amplifier wiring

Just a reminder - don’t forget to follow Jetson Nano I2S audio instructions first (mentioned in the previous post). It won’t work without patched DTB.

  • LRC -> pin 35
  • BCLK -> pin 12
  • DIN -> pin 40
  • GND -> pin 6, 9, 14, 20, 25, 30, 34, 39
  • Vin -> pin 2, 4

Volume control

ADMAIF is the DMA interface to the APE (Audio Processing Engine). There’re 10 of them on the Tegra 210. By default ADMAIF1 is connected directly to I2S4 for I2S playback and there’s no volume control for it.

We can route the audio from ADMAIF1 to MVC (Master Volume Control) and then to I2S4 with the following commands:

amixer -c tegrasndt210ref cset name='I2S4 Mux' MVC1
amixer -c tegrasndt210ref cset name='MVC1 Mux' ADMAIF1

Volume (0 - 16000) can be set with the following command:

amixer -c tegrasndt210ref cset name='MVC1 Vol' 12000

Don’t forget to install ALSA utilities:

apt-get install alsa-utils

Visit Rasperry Pi compatible I2S sound card topic for more details (or PulseAudio guide).

Playback test

WAV

aplay -D hw:tegrasndt210ref,0 test.wav

MP3

Install SoX (an audio file-format and effect library):

apt-get install sox libsox-fmt-all

Play MP3 file:

AUDIODEV=hw:tegrasndt210ref,0 play test.mp3

Here’s the video with sound. It sounds much better in reality. Probably due to the fact that it was recorded with my very old iPhone SE.

Speaker popping

There’s a small problem with this setup - speaker pops just before & after the playback. This is covered by the Pi I2S Tweaks page. Unfortunately, didn’t have time to test these tweaks yet.

Current status


  • Nanny bot can see
  • Nanny bot can move
  • Nanny bot can play music / sound effects

From the HW point of view, everything is wired and tested.

Soo, what’s next?

I have to buy some nice toy for kids to use it as a cover. There must be a hidden place for camera, speaker, battery charging port and battery power button. As my father said, it’s quite easy to connect all the wires, but when it comes to the box, cover, housing, … we have a problem :wink:

Stay tuned, I have to visit couple of stores and check what’s available and what can potentially fit my use case :slight_smile:

Undercover

Bottom of the bot is open and fragile. Printed undercover:

It’s more robust now:

It nicely holds all the wires and can go over small obstacles without a fear.

Camera mount

Original

Original camera mount has few disadvantages (for my project, otherwise it’s perfectly okay):

  • it’s too close to the Jetson Nano board,
  • fixed angle.


Image source - provided by NVIDIA.

Adjustable angle mount

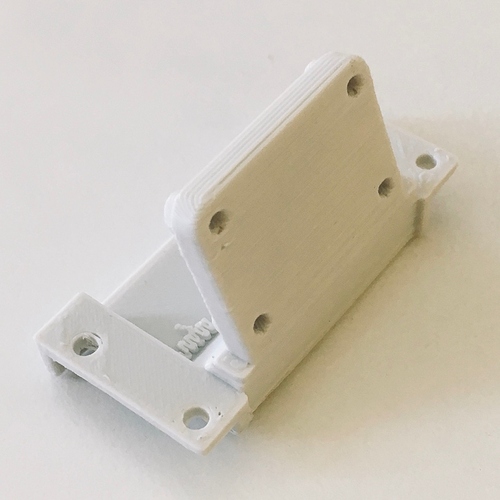
I’ve found Adjustable Angle Raspberry Pi Camera Mount:

Suits my needs, but the base doesn’t fit. It’s too wide. Didn’t check dimensions, my bad, I had to cut off few mm (like 2-3):

Rest is perfect, fits nicely.