I am looking to deploy a couple of SoCs into my vehicles so I can start building monitoring and control functionality. I currently have a Beaglebone Green Wireless on hand and will start with that. I easily got BalenaOS running on it and deployed a simple Python container, which was an incredibly smooth and well thought out process: kudos to the Balena team.
I’m quite comfortable with Python and very green when it comes to hardware, so please bare with me.
My next step is to read value from the GPIO pins and I would your collective advice on where to start: every example BB project seems to use a different set of libraries for hardware access. Adafruit Blinka seems to be an attempt at homogenizing hardware access, which appeals to me. But I can’t find any examples for the Beaglebone platform. Which Python libraries do you think I should start with?
Is there anything I need to configure at the system-level before I can access the hardware from inside the Python container?
If you think I’m starting with the wrong SoC, please tell me, I really don’t mind picking up something else!
Perhaps you’ve tried something like this Adafruit_BBIO module in addition to Adafruit Blinka? These may or may not work with the native balena-python image, but you could also experiment with different OS-image flavors (like Alpine or Ubuntu) and install python via a container Dockerfile. Either way, you’ll need to give the container you want to access the BB GPIO permission to access device components by adding privileged: true in the service description in your docker-compose.yml file.
I’ve done something similar using an RPi to get a container to talk to a DHT11 temperature and humidity sensor. After initializing the GPIO (and importing the proper Python modules), I was able to create a dht11 instance that set the pin (last code line before the --snip-- below):
import RPi.GPIO as GPIO
import dht11
import time
import datetime
import json
from flask import Flask, request, Response

app = Flask(__name__)

# initialize GPIO
GPIO.setwarnings(False)
GPIO.setmode(GPIO.BCM)
GPIO.cleanup()

# read data using pin 17
instance = dht11.DHT11(pin=17)
-- snip--
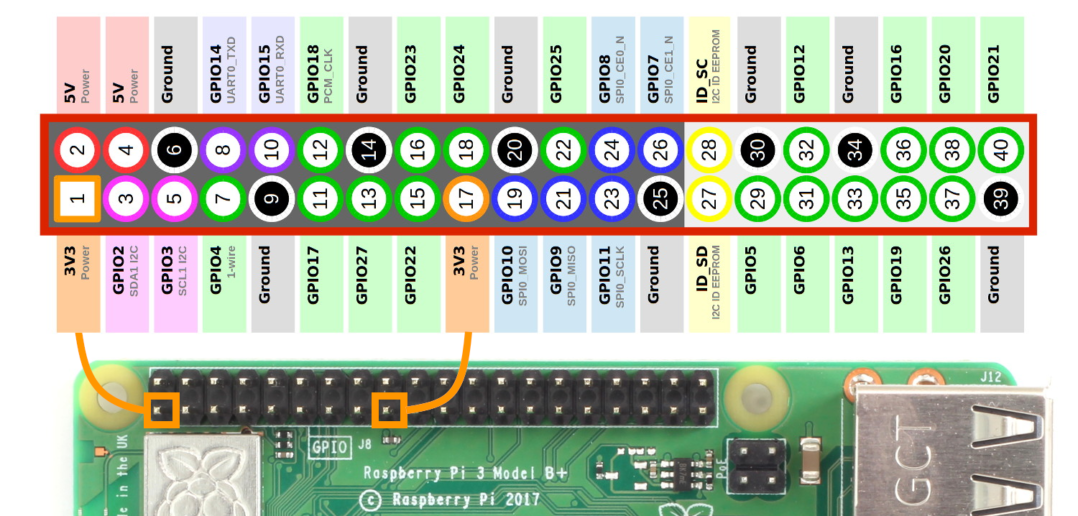
In this case, Python is able to read the values from the DHT11 (via pin GPIO17) with a result = instance.read() to provide the actual temp/humidity values. The trick with the RPi GPIO header was to correctly map the GPIO pin to the physical pin, which are not the same. In the case of the RPi, “GPIO17” is physical pin 11, for example.
It can be handy to start with a 1-wire sensor or DHT or BME680 because they’re relatively simple compared to more robust HATs. Our balenaSense project outlines some of this, and you may find it instructive, albeit for the RPi.
Yes, a single container should be privileged by default. I always like to make it explicit because I always seem to forget when adding additional services. Here’s a simple example:
Does anyone know how the hardware device overlays work under Balena’s images?
My first attempt, using 3.8-stretch:
>>> from Adafruit_BBIO import ADC
>>> ADC.setup()
Traceback (most recent call last):
  File "<stdin>", line 1, in <module>
RuntimeError: Unable to setup ADC system. Possible causes are:
  - A cape with a conflicting pin mapping is loaded
  - A device tree object is loaded that uses the same name for a fragment: helper
The Adafruit-BBIO that is in PiPy won’t build on buster, an issue which is fixed in their repo but no release has been pushed.
You may want to look at this forum post to see an example on how the device tree overlays was done on a beagle bone device. You may also refer to the docs to see how to set device tree overlays and parameters on balenaOS.
I believe it’s only possible to define these values before flashing the image to a device, as there’s currently no runtime support for modifying the uEnv.txt file.
